OldSewinGear
  • Blog
    • Blog Index
    • Site Map
  • Singer
    • Slant Needle >
      • 301
      • 401 / 403 / 404
      • 500 / 503
      • 601 / 603 /604
    • Class 15 Machines
    • Class 66 Machines
    • Featherweight
    • Swing Needle
    • Toy Machines
    • Accessories >
      • Buttonholer
      • Discs & Cams
  • Others
    • Pfaff
    • Elna
    • Necchi
    • Japan Class 15
  • Resources
    • FAQ
    • Links
    • Cheat Sheets
    • Shipping & Packaging
  • Contact
    • About Us

The Pink of Perfection - Singer Pinking Attachment

6/27/2014

8 Comments

 
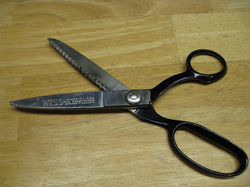
PictureWISS Pinking Shears
Feeling frayed around the edges?  If so, you have a lot in common with vintage fashion. 

Fraying seam allowances were a common problem in the days of straight-stitch-only sewing machines.  The advent of the zigzag machine was a step in the right direction and eventually the overlock serger eliminated the problem altogether. 

But what did people do BEFORE zigzag stitch? 

That's a good question and (at the risk of irritating my readers) I'm going to answer it with another question. 

Have you ever heard of "Pinking Shears?"

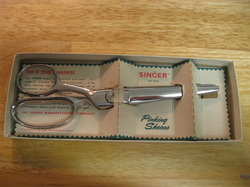
PictureSinger Pinking Shears
If you haven't, don't feel bad.  They're not terribly common these days due to the modern machines mentioned above.  I grew up with my grandmother's Featherweight and sewing kit, so pinking shears are old familiar friends to me. 

But for the newbies among us, pinking shears are scissors that cut a zigzag or scalloped line.  These days we call them scrapbooking scissors because they add a decorative edge to photos and embellishments.

However, when it came to sewing, the decorative aspect of pinking shears was secondary to their primary function of mitigating fraying of seam allowances.  The scallops meant that a snagged thread along the seam allowance would only fray a short section, not the entire seam. 

Clever, huh? 

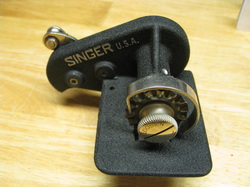
PictureSinger ball bearing Pinking Attachment
As wonderful as pinking shears were, they could be a real pain if you had yards and yards of seam allowances to pink.  Literally a pain.  These days we have plastic handles and spring action to reduce fatigue, but vintage pinking shears were all steel, which took muscle to hold and operate.  

Which led to the introduction of the pinking machine, which was roughly equivalent to the invention of electric scissors. 

Singer's first pinking machine was the ball bearing hand operated Singer Pinker, which was a hand-crank model which clamped to the table edge.  A rotary scalloped blade easily pinked the edges of long seams without scissors. 

In the 1930's, Singer improved on the hand-crank model by introducing the automated ball bearing Singer Pinking Attachment (Simanco Part No. 121111).

No more hand cranking.  Simply hook it to your sewing machine, step on the foot control, and voila!

Want to see it in action?  (I thought you'd never ask!)
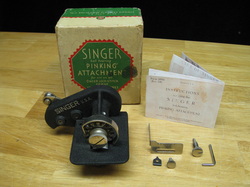
PictureSinger Pinking Attachment with parts
Pretty cool, isn't it?  I'm continually amazed by the ingenuity of the inventors who dreamed up this stuff all those years ago. 

Now that you've seen it, you're probably wondering "Where do I get one?" 


Well, they aren't terribly common.  I've only encountered two over the years.  They came in glossy black finish or pebbled black finish (as shown).  They do show up on eBay in varying conditions and degrees of completeness. 

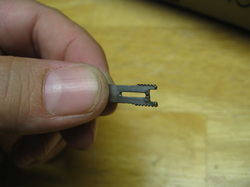
If you're contemplating purchasing a Singer Pinking Attachment, examine the photos and description carefully to see if anything vital is missing. Commonly missing pieces include the spring-loaded screw that attaches the pinker to the presser foot bar, the adjustable edge guide and the L-shaped pin that locks the gears to enable blade removal.  The pin can be easily fabricated, but the edge guide and attaching screw will be trickier to replace.  You might be able to get by without the pin and edge guide, but you absolutely have to have an attaching screw.  The instruction booklet may also be missing but pdf copies are available from several online sources. 

So there you have it, the vintage answer to fraying edges.  Are you tickled pink now?  (Couldn't resist that one.)

Happy Sewing!
Barbara

OldSewinGear...dedicated to helping you get the most out of your old sewing gear.


8 Comments

Rocket-eer Surgery

6/8/2014

2 Comments

 
One of our readers asked how to reassemble the stitch-length adjustment knob on her 503 Rocketeer.  She took hers apart to clean it and then encountered a problem getting the pieces back together.  I didn't know the answer either, so I went and asked the resident expert.  He explained it to me and I went and tried it out for myself and took some pictures and videos to share.

Without further ado, here's how to reassemble the 500/503 stitch-length adjustment lever knob.   First we'll look at taking it apart and then we'll look at putting it back together.

Picture
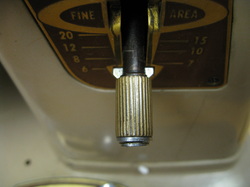
The lever has a knurled knob on the end that tightens up against the face plate to select the desired stitch length. 

There are two wings on the lever that slot into the notches at the "fine" selection and the "6" selection to lock those settings into place. 

Picture
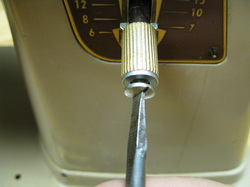
To disassemble the knob, use a standard screwdriver to remove the screw at the end of the shaft.  Then pull the whole knob assembly toward you.  It will slide off along with the small washer that sits on the end of the shaft between the screw and the knurled knob.

Picture
The winged piece screws up inside the knob and will have to be unscrewed for proper cleaning and lubricating. 

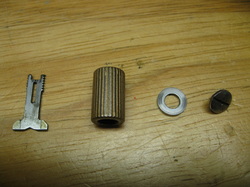
When you've finished disassembly the knob, you'll have four pieces as shown at left.  Next, a light application of lubricant on the inside the knob will aid in reassembly.  

Picture
Putting the knob back together can be a bit tricky because threading the winged piece back into the knob works opposite from the old "lefty-loosey, righty-tighty" principle. 

Start by holding the winged end in your left hand.  Then take the knob in your right hand and screw it onto the end of the winged piece, turning it toward you. This is best shown in video:
 

Next the winged end will be inserted into the slot on the lever and the washer and screw put back in place.  Again, this is best demonstrated in video:
As you can see, it only took a little bit of fumbling to get the pieces back together.  Believe me, it will be a lot easier if one hand isn't tied up holding a camera!

And there you have it.  Make sure everything is firmly tightened and your knob will be good as new. 

Happy Sewing!
Barbara

OldSewinGear...dedicated to helping you get the most out of your old sewing gear.

2 Comments

Which Disc is Which?

6/7/2014

20 Comments

 
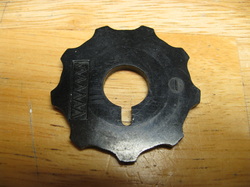
PictureSinger top-hat style Fashion Disc
Still puzzling over whether that box of Touch & Sew discs will work in your 401 or 500 Slant-o-Matic? 

You're not alone.  In fact, that is one of the most common reader questions I receive..."will these discs work?"

If you've already read the articles
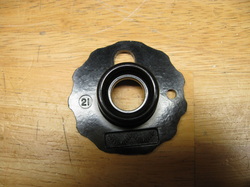
"Disc-o-Mania! Special Discs & Fashion Discs" and "How to Use a Singer Special Disc" then you already know that the 400 and 500 series Slant-o-Matics use a hard black plastic fashion disc with a raised center, commonly referred to as a "top-hat" cam.

So you're in a thrift store and see a set of top-hat cams in box marked Singer Touch & Sew Model 648 or 758 or whatever and you wonder...will these work? 

The simple answer is: maybe yes, maybe no. 

Let's take a look a the different discs Singer manufactured between 1950-1975. 


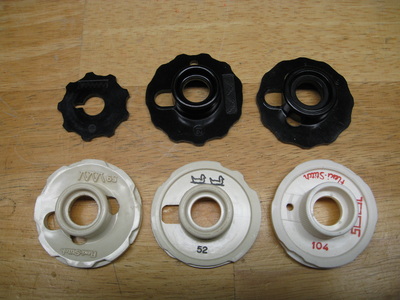
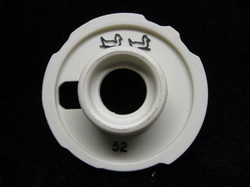
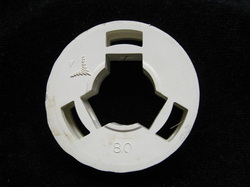
Singer Fashion Discs & Flexi-Stitch Discs.
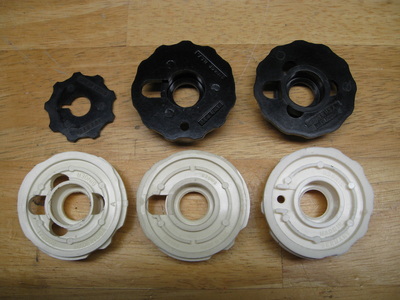
Fashion Disc and Flexi-Stitch discs - bottom view
Pretty confusing, right?  So which disc is which and which machine do they work in?  Let's take a closer look.

Note:  I've only listed model numbers that are known to work with the disc shown.  Discs may also work in other models but have not been tested.

PictureSinger Fashion Disc
Fashion Disc
Small, flat disc fits vertical needle machines such as 306 and 328.


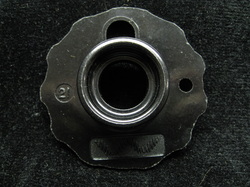
PictureSinger Special Disc (Type 1)
Fashion Disc / Special Disc (Type 1)
Top-hat style disc with slim center ring with 2 adjacent holes.  Fits 401, 403, 411, 431, 500, 503, 600, 603, 626, 648

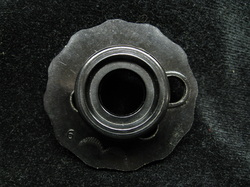
PictureSinger Special Disc (Type 2)
Fashion Disc / Special Disc (Type 2)
Later top-hat style single-layer disc with wide center ring surrounded by 4 holes.  Fits 690, 700, 758. 


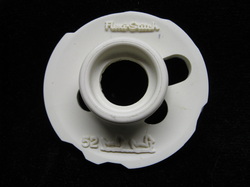
PictureSinger Flexi-Stitch Disc
Flexi-Stitch Disc
Double-layer disc with top-hat center ring surrounded by 4 holes.  Fits 690, 700, 758
. (Often packaged with single-layer type-2 special disc.)


PictureSinger Flexi-Stitch Disc
Flexi-Stitch Disc
Double-layer disc with top-hat style center ring with one adjacent hole.  Fits 740/760.  (May be packaged with single-layer type 1 special disc.)


PictureSinger Futura Disc
Futura Disc

Flat reversible disc has a pattern on each side.  Fits Futura models. 


So we can see at a glance that the small flat disc and the larger white discs WON'T work in a 401 or 500 machine. 

(The white discs are double-layer discs designed to work in machines with two cam-followers.  This allows patterns which move the fabric forwards and backwards to produce complex designs such as Greek Key, Flowers, or Ducks.  While Elna and Necchi were producing double- and triple-layer discs as early as the 1950's, Singer didn't catch up until they introduced the 700-series Touch & Sew models in the late 1960's.)

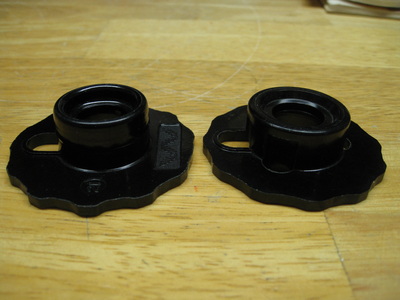
So the white discs are out, but you may still be confused by the two styles of black top-hat discs (I personally call them Type 1 and Type 2, but it's not an official name).  So let's compare them side by side:
Type 1 (left) & Type 2 (right) Special Disc comparison
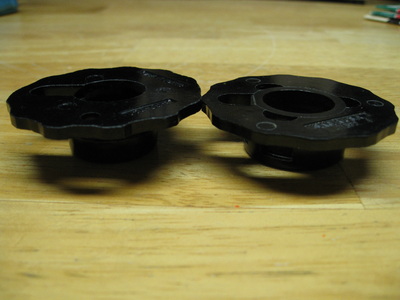
Type 1 (left ) and Type 2 (right) Special Disc comparison - bottom view
PictureType 1 and Type 2 Special Disc comparison
Except for the thicker center ring and number of holes, they look pretty identical, don't they? 

Which means either one should work, right?  

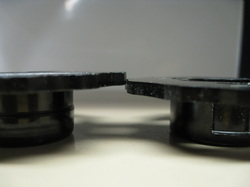
Wrong.  A closer examination reveals that the later disc is also slightly shorter.


This difference in height combined with the fatter center ring means that this disc doesn't snap firmly into place on the 401/403, 500/503, and 600/603 models.

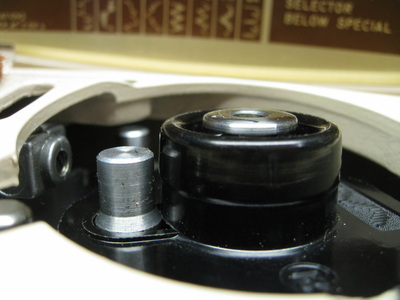
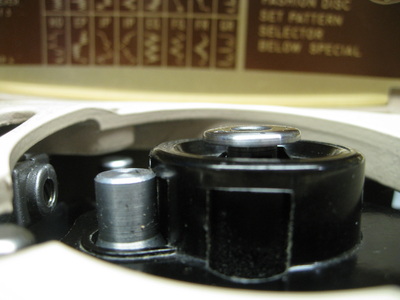
The issue can be clearly seen when comparing both discs side by side in the machine:


As you can see, the overhanging lip on the later disc hangs up on the post, preventing the disc from seating firmly.  The disc sits crooked and eventually wobbles loose, resulting in an erratic stitch. 

The simple solution is to make sure you purchase the correct disc in the first place.  But what if you can't find the correct disc? 

There is a creative solution.   A dremel tool with a sanding tip can be used to grind down the overhanging lip which will allow the disc to snap into place.  Be careful to remove as little plastic as possible so as not to compromise the structural integrity of the disc.

So there you have it.  Now you know what to look for to select the right disc for your 401 or 500 Slant-o-Matic.  And if you accidentally wind up with the wrong disc, there's still a way to make it work! 

That's what I call a win-win.  

Happy Sewing!
Barbara

OldSewinGear...dedicated to helping you get the most out of your old sewing gear.
20 Comments

    News, Reviews, 
    & How-To's

    See "Article Index" for list of past articles by title. 

    See "Frequently Asked Questions" for quick answers to common questions.  

    Check out "Cheat Sheets" to download printable reference sheets.

    See "Resources" for links to useful websites and forums. 

    Contact Us

    Questions, comments
    ​or suggestions? 
    Contact us!  

    Categories

    All
    15-125
    15 91
    192 Spartan
    201
    221 Featherweight
    301
    328
    401
    403
    411
    500
    503
    600
    603
    626
    99
    Adjustment/repair
    Appraisal & Pricing
    Attachments
    Bobbin
    Centennial
    Checklist
    Dating
    Greist
    Historical Info
    How To
    Japanese
    Miscellaneous
    Model Comparisons
    Reviews
    Shipping
    Singer
    Slant Needle
    Tips & Tricks
    Toyota
    Toys
    Treadle
    Video


    Archives

    June 2020
    April 2020
    August 2019
    March 2018
    October 2015
    August 2015
    March 2015
    January 2015
    December 2014
    November 2014
    October 2014
    August 2014
    June 2014
    March 2014
    February 2014
    December 2013
    November 2013
    September 2013
    August 2013
    July 2013
    June 2013
    May 2013
    April 2013
    March 2013
    February 2013
    December 2012
    November 2012
    October 2012
    September 2012
    August 2012
    June 2012


    About Us

    OldSewinGear is the collaborative effort of retired repairman Gary and daughter Barbara.  We love old sewing gear and enjoy sharing what we've learned in our vintage sewing machine adventures.  We are located in Roseburg, Oregon. 


    RSS Feed

© 2019 OldSewinGear
  • Blog
    • Blog Index
    • Site Map
  • Singer
    • Slant Needle >
      • 301
      • 401 / 403 / 404
      • 500 / 503
      • 601 / 603 /604
    • Class 15 Machines
    • Class 66 Machines
    • Featherweight
    • Swing Needle
    • Toy Machines
    • Accessories >
      • Buttonholer
      • Discs & Cams
  • Others
    • Pfaff
    • Elna
    • Necchi
    • Japan Class 15
  • Resources
    • FAQ
    • Links
    • Cheat Sheets
    • Shipping & Packaging
  • Contact
    • About Us