OldSewinGear
  • Blog
    • Blog Index
    • Site Map
  • Singer
    • Slant Needle >
      • 301
      • 401 / 403 / 404
      • 500 / 503
      • 601 / 603 /604
    • Class 15 Machines
    • Class 66 Machines
    • Featherweight
    • Swing Needle
    • Toy Machines
    • Accessories >
      • Buttonholer
      • Discs & Cams
  • Others
    • Pfaff
    • Elna
    • Necchi
    • Japan Class 15
  • Resources
    • FAQ
    • Links
    • Cheat Sheets
    • Shipping & Packaging
  • Contact
    • About Us

Rocket-eer Surgery

6/8/2014

2 Comments

 
One of our readers asked how to reassemble the stitch-length adjustment knob on her 503 Rocketeer.  She took hers apart to clean it and then encountered a problem getting the pieces back together.  I didn't know the answer either, so I went and asked the resident expert.  He explained it to me and I went and tried it out for myself and took some pictures and videos to share.

Without further ado, here's how to reassemble the 500/503 stitch-length adjustment lever knob.   First we'll look at taking it apart and then we'll look at putting it back together.

Picture
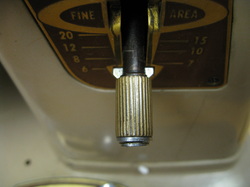
The lever has a knurled knob on the end that tightens up against the face plate to select the desired stitch length. 

There are two wings on the lever that slot into the notches at the "fine" selection and the "6" selection to lock those settings into place. 

Picture
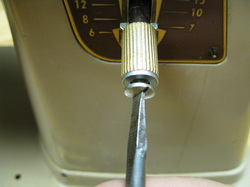
To disassemble the knob, use a standard screwdriver to remove the screw at the end of the shaft.  Then pull the whole knob assembly toward you.  It will slide off along with the small washer that sits on the end of the shaft between the screw and the knurled knob.

Picture
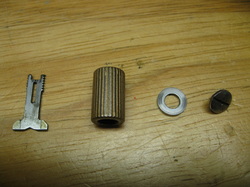
The winged piece screws up inside the knob and will have to be unscrewed for proper cleaning and lubricating. 

When you've finished disassembly the knob, you'll have four pieces as shown at left.  Next, a light application of lubricant on the inside the knob will aid in reassembly.  

Picture
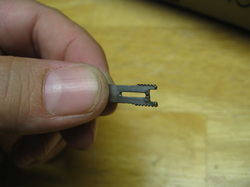
Putting the knob back together can be a bit tricky because threading the winged piece back into the knob works opposite from the old "lefty-loosey, righty-tighty" principle. 

Start by holding the winged end in your left hand.  Then take the knob in your right hand and screw it onto the end of the winged piece, turning it toward you. This is best shown in video:
 

Next the winged end will be inserted into the slot on the lever and the washer and screw put back in place.  Again, this is best demonstrated in video:
As you can see, it only took a little bit of fumbling to get the pieces back together.  Believe me, it will be a lot easier if one hand isn't tied up holding a camera!

And there you have it.  Make sure everything is firmly tightened and your knob will be good as new. 

Happy Sewing!
Barbara

OldSewinGear...dedicated to helping you get the most out of your old sewing gear.

2 Comments
Sara
6/14/2014 12:27:03 pm

Thank you so much. Once I knew about the righty loosey, it was really easy to fix.

I think the other rocketeer I got does have busted hinges, but since I paid 25 along with 24 fashion discs and a buttonholer, and the manual, I figure even if I use it for parts, I'm fin

Reply
Sara
6/14/2014 12:28:54 pm

Away, if I go backwards at all, the site won
T let me keep going. I was going to say it worked great, and thank you and top dad so much!

Reply


Leave a Reply.

    News, Reviews, 
    & How-To's

    See "Article Index" for list of past articles by title. 

    See "Frequently Asked Questions" for quick answers to common questions.  

    Check out "Cheat Sheets" to download printable reference sheets.

    See "Resources" for links to useful websites and forums. 

    Contact Us

    Questions, comments
    ​or suggestions? 
    Contact us!  

    Categories

    All
    15-125
    15 91
    192 Spartan
    201
    221 Featherweight
    301
    328
    401
    403
    411
    500
    503
    600
    603
    626
    99
    Adjustment/repair
    Appraisal & Pricing
    Attachments
    Bobbin
    Centennial
    Checklist
    Dating
    Greist
    Historical Info
    How To
    Japanese
    Miscellaneous
    Model Comparisons
    Reviews
    Shipping
    Singer
    Slant Needle
    Tips & Tricks
    Toyota
    Toys
    Treadle
    Video


    Archives

    June 2020
    April 2020
    August 2019
    March 2018
    October 2015
    August 2015
    March 2015
    January 2015
    December 2014
    November 2014
    October 2014
    August 2014
    June 2014
    March 2014
    February 2014
    December 2013
    November 2013
    September 2013
    August 2013
    July 2013
    June 2013
    May 2013
    April 2013
    March 2013
    February 2013
    December 2012
    November 2012
    October 2012
    September 2012
    August 2012
    June 2012


    About Us

    OldSewinGear is the collaborative effort of retired repairman Gary and daughter Barbara.  We love old sewing gear and enjoy sharing what we've learned in our vintage sewing machine adventures.  We are located in Roseburg, Oregon. 


    RSS Feed

© 2019 OldSewinGear
  • Blog
    • Blog Index
    • Site Map
  • Singer
    • Slant Needle >
      • 301
      • 401 / 403 / 404
      • 500 / 503
      • 601 / 603 /604
    • Class 15 Machines
    • Class 66 Machines
    • Featherweight
    • Swing Needle
    • Toy Machines
    • Accessories >
      • Buttonholer
      • Discs & Cams
  • Others
    • Pfaff
    • Elna
    • Necchi
    • Japan Class 15
  • Resources
    • FAQ
    • Links
    • Cheat Sheets
    • Shipping & Packaging
  • Contact
    • About Us