OldSewinGear
  • Blog
    • Blog Index
    • Site Map
  • Singer
    • Slant Needle >
      • 301
      • 401 / 403 / 404
      • 500 / 503
      • 601 / 603 /604
    • Class 15 Machines
    • Class 66 Machines
    • Featherweight
    • Swing Needle
    • Toy Machines
    • Accessories >
      • Buttonholer
      • Discs & Cams
  • Others
    • Pfaff
    • Elna
    • Necchi
    • Japan Class 15
  • Resources
    • FAQ
    • Links
    • Cheat Sheets
    • Shipping & Packaging
  • Contact
    • About Us

Spring into Action

12/22/2014

4 Comments

 
So the sliding cover to the bobbin compartment on your 401A has popped off and you can't get it to stay on.  So you take a closer look and discover that the spring that holds it in place has broken. 

Now what?

Picture
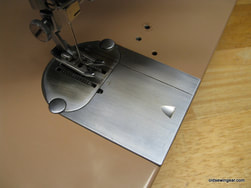
Singer 401A bobbin cover plate
On closer inspection you can see the screw that holds the spring in place.  There's just one problem...you can't get to it...
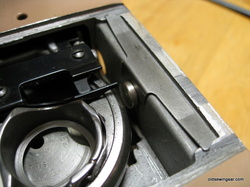
The head of the screw is blocked by the hook and bobbin case.  So how do you get to it?

The solution is simple...if you know where to look.  The first step is to tilt the machine back and look under the lip of the sewing platform directly below the bobbin compartment.

Picture
Slide plate spring with attaching screw.


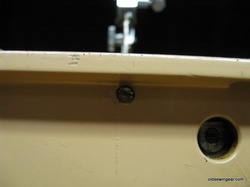
Beneath the lip you'll see what looks like the end of a screw with a slot in it.  It looks like the tip of a screw because that's what it is.  In fact, it's the end of the screw that holds the spring in place.  You can't access the head of the screw down inside the bobbin compartment, but you can unscrew it from the opposite end on the outside of the machine. 
Picture
Attaching screw for bobbin cover plate.
Using a standard screwdriver, turn the screw clockwise to loosen.  (This is opposite of the usual "Lefty loosey, righty tighty" principle because you're working on the tip of the screw, not the head of the screw.) 

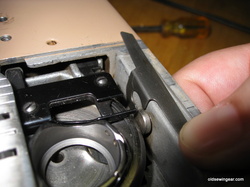
Once the screw is loose, remove the spring by sliding to the right, tilting slightly, and lifting out. 

Picture
Remove spring by sliding to right and tilting slightly.
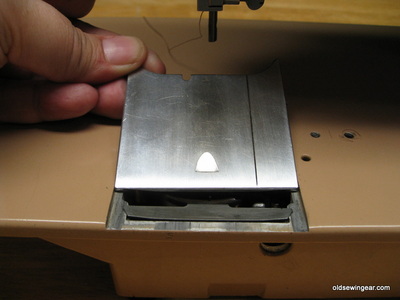
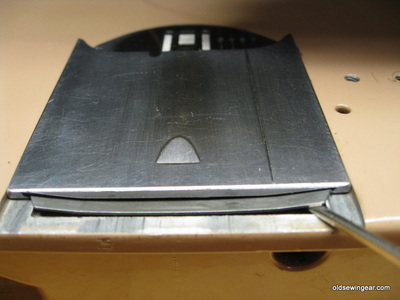
Replace the broken spring and reverse the steps to tighten the screw.  Once the spring is fixed in place, reattach the sliding plate.  Position the plate behind the spring and use a small screwdriver to lift the wings of the spring into the grooves of the slide plate.  Slide plate towards you to snap into place. 
Position slide plate behind spring.
Lift wings of spring into grooves of slide plate as you slide the plate towards you.
There you go, as easy as one, two, three!  Want to see it in video? 
There, problem solved. Slant-o-Matic models 403, 404, 500, 503, 600, 603, 604 (and other 600-series models) share this same design, so these instructions work for those models too!

Happy Sewing!
Barbara


OldSewinGear...dedicated to helping you get the most out of your old sewing gear. 
4 Comments
Sak
1/13/2015 01:38:19 am

Thanks, Barbara. This works perfectly. Except the screw holding the broken spring has, you guessed it, been replaced with something that doesn't have a slot for a screw at the back. Not sure what to do, unless I could somehow chisel a screw slot into the back of the screw! Ugh.

Reply
Sak
2/11/2015 02:23:06 am

Continuing saga of the broken spring: the screw has no slot, but I have found a repair shop that will take it apart and re-time it for 60 dollars. I figure while its undone, I should replace the screw so I don't run into this next time. But where can I find that screw with the slot in the front and the back? And what is it called while I search? Any ideas? Thank you in advance.

Sak

Reply
OldSewinGear
2/11/2015 10:40:27 am

So sorry to hear you're still struggling with what should have been a very simple repair. I don't know of any magic source for the split screw, so my recommendation would be to check with a local machinist to see if they can fabricate one for you. Hope this helps, Barbara

Reply
April
4/10/2020 10:34:05 am

I got this sewing machine when my MIL passed. I don't know if it was in working order or not but pulled it out last night, followed along to set but basic setting (straight stitch, utility foot, etc) and I noticed it needed a needle. Loosen and put a universal needle in from the box of assorted 'sewing stuff" I also received (placing the flat part to the back) and it either isnt able to be placed deep enough or it is hitting something underneath the plate. Two broken needles later I'm searching for answers. LOL. Help :)

Reply


Leave a Reply.

    News, Reviews, 
    & How-To's

    See "Article Index" for list of past articles by title. 

    See "Frequently Asked Questions" for quick answers to common questions.  

    Check out "Cheat Sheets" to download printable reference sheets.

    See "Resources" for links to useful websites and forums. 

    Contact Us

    Questions, comments
    ​or suggestions? 
    Contact us!  

    Categories

    All
    15-125
    15 91
    192 Spartan
    201
    221 Featherweight
    301
    328
    401
    403
    411
    500
    503
    600
    603
    626
    99
    Adjustment/repair
    Appraisal & Pricing
    Attachments
    Bobbin
    Centennial
    Checklist
    Dating
    Greist
    Historical Info
    How To
    Japanese
    Miscellaneous
    Model Comparisons
    Reviews
    Shipping
    Singer
    Slant Needle
    Tips & Tricks
    Toyota
    Toys
    Treadle
    Video


    Archives

    June 2020
    April 2020
    August 2019
    March 2018
    October 2015
    August 2015
    March 2015
    January 2015
    December 2014
    November 2014
    October 2014
    August 2014
    June 2014
    March 2014
    February 2014
    December 2013
    November 2013
    September 2013
    August 2013
    July 2013
    June 2013
    May 2013
    April 2013
    March 2013
    February 2013
    December 2012
    November 2012
    October 2012
    September 2012
    August 2012
    June 2012


    About Us

    OldSewinGear is the collaborative effort of retired repairman Gary and daughter Barbara.  We love old sewing gear and enjoy sharing what we've learned in our vintage sewing machine adventures.  We are located in Roseburg, Oregon. 


    RSS Feed

© 2019 OldSewinGear
  • Blog
    • Blog Index
    • Site Map
  • Singer
    • Slant Needle >
      • 301
      • 401 / 403 / 404
      • 500 / 503
      • 601 / 603 /604
    • Class 15 Machines
    • Class 66 Machines
    • Featherweight
    • Swing Needle
    • Toy Machines
    • Accessories >
      • Buttonholer
      • Discs & Cams
  • Others
    • Pfaff
    • Elna
    • Necchi
    • Japan Class 15
  • Resources
    • FAQ
    • Links
    • Cheat Sheets
    • Shipping & Packaging
  • Contact
    • About Us